Thursday, September 26, 2013

Is it October yet?

Walking around in the stores lately is really putting me in the Halloween spirit. Is it Halloween time yet? I literally can't wait. Literally.  I was feeling so inspired by a pin on Pinterest that I actually saw last year but never got around to making it so I whipped up a little art during the kid's naps.


The frame was already in this spot with something else I had made so I thought I would steal it for this project. And I'm noticing that frame needs a little caulk!


I used some black and white chevron fabric and Mod Podge to glue it around a piece of cardboard. When it dried in the back I simply cut out the print from online and used glue to attach the "Eat, Drink, and Be Scary" print to the fabric. SO simple!  However I'm now considering painting that frame a shiny black and caulking those seems. I think it would make that fabric stand out a bit more.


Oh and the kid's helped me make our Alfred E. Newman print a little scary by adding some red devil horns with the Mod Podge.


And as usual I switched up all the frames in our entry way to Halloween prints that I save tucked behind the prints I usually have on display. All of those images are found on The Graphics Fairy website.


I am just getting started ladies and gentlemen.  I've got a few more crafts up my sleeve for the weekend. I'm going to O.D. on Halloween yet again!

xo
Cathleen

Saturday, September 21, 2013

DIY Rock Candy


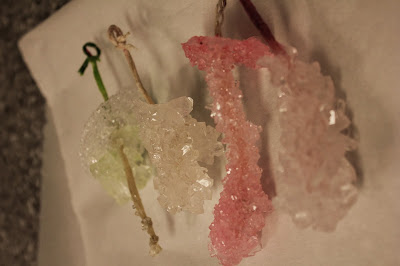
We are nerds at heart and had to try this fun science experiment with the kids. It took a lot of patience waiting for this to happen, but I think they were pretty excited to see the crystals forming on our rock candy. They got to watch it over a period of about a week and we finally ended up with these. Pure sugary goodness. 


DIY Rock Candy Recipe
Ingredients:
4 cups sugar
1 cup water
Food coloring of your choice
Clean glass mason jars
String, cut into 8-inch lengths
Pencils
Preparation:
In a medium saucepan, heat 2 cups of the sugar and the water. Do not bring to a boil. Stir until the sugar is completely dissolved. Gradually add a few drops of the food coloring of your choice and the additional sugar, stirring continuously until all the sugar is dissolved.

Pour the solution into a clean glass jar and tie the pieces of string to the pencil and suspend them across the mouth of the jar so that the ends hang into the sugar water.

Crystals suitable to eat will form in an hour and continue for several days to a week. Pieces can be broken off and eaten after the first hour. (But, try to hold out for big crystals!)

Although you may see quick results in small measure, the larger rock candy crystals you're accustomed to seeing in the candy store will take at least a week to form.

Yield: 12 ounces

Recipe derived from About.com

xo
Cathleen
Related Posts Plugin for WordPress, Blogger...
 

©Copyright PeaHen Pad 2010-2024. All Rights Reserved.