


Something about 2020 and 2021 has us going FULL Macabre. We spend every day making something for Halloween. Today we illustrate how to make your own coffin out of exterior grade plywood. This thing will last a lifetime -maybe even an afterlife! 💀

The instructions and supply list are below. This entire project took about 2 days. The first day was buying the supplies, cutting everything and making just the base. The second day was building the lid, staining and then applying the finishing touches.


The stain is by Valspar called One-Coat Exterior Stain and Sealer in Semi-Transparent and the color is Darkest Night.


DIRECTIONS (Changed a bit from the Popular Mechanics Website)
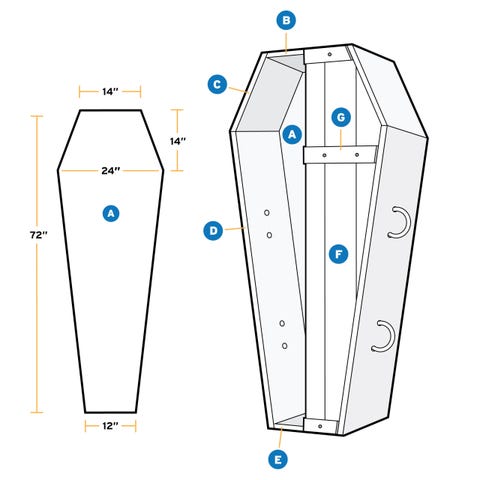
1. Layout all of your wood and draw the shape of the bottom of the coffin and cut it to shape using a circular saw.
2. Eyeball the angle setting on your circular saw and make some test cuts on scrap to get the miter.
3. Begin with the long side on the left (D). Crosscut it slightly overlong then use the circular saw to cut its mitered end. Temporarily fasten it to the bottom. Follow the same procedure with the short side that abuts it (C). Crosscut it slightly overlong, cut its mitered end, and temporarily fasten it.
4. Place the head board (B) so you can mark its length and angled ends. Cut it to length and fasten it. Now mark the angle on the overhanging end of the short side (C). Remove it, cut the short side to length and permanently fasten it to the bottom board.
5. Work your way around the coffin, temporarily fastening each side, cutting the miters and angled ends as you go. The last cut will be the angled end on the long side where you started (D).
6. Lay the five 1 x 6 for the lid on the work bench and crosscut some scraps for three inner cleats across their width. Leave an inch of air space between the end of each cleat and the edges of the 1 x 4. Fasten the cleats with drywall screws.
7. Invert the coffin on the 1 x 6s, aligning its center with the middle of the center board. Mark the coffin perimeter on the boards and cut the lid to shape. Turn the lid right side up and fasten three more scrap wood cleats across its top.
8. Complete the coffin by staining it and adding hardware like handles and making holes for the rope.
Coffin Materials List
Part A (Bottom), 3/4" x 24" x 72"
Qty: 1
Part B (Head board), 3/4" x 11 ¼" x 14"
Qty: 1
Part C (Short side ) 3/4" x 11 ¼" x 16 1/8"
Qty: 2
Part D (Long side) 3/4" x 11 ¼" x 58"
Qty: 2
Part E (Foot board) 3/4" x 11 ¼" x 12"
Qty: 1
Part F (Lid) 3/4" x 25 ½" x 73 ½"
Qty: 1
Part G (Cleat) Size and length to suit.
Qty: 6
Construction Notes:
All dimensions are maximum outside
Scrap wood cleats are cut and placed to suit
Gaps are okay, especially if coffin is lighted from inside
Shopping List
1" x 6" x 8', Qty: 3
1" x 6" x 8', Qty: 5
1 ¾ x 4' x 8' ply., exterior grade
1 box of No. 8 x 1 5/8" screws
1 pkg 3/8 in. twisted sisal rope, 2 Four foot chains, anchor shackles, stain and spray paint.

Can't wait for Halloween night so we can add our Dummy to the inside. And with our new Fog machine the yard will look extra spooky.
Happy October!
😱🎃
Cathleen


