Showing posts with label DIY. Show all posts

Wednesday, June 18, 2025

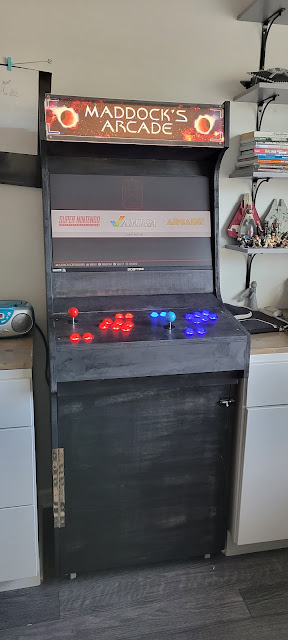
DIY Arcade

Last Christmas was pretty well spent at home making stuff.  The boys had a good time working on one of their Christmas presents with Dad.  A custom Arcade.  It was a pretty long project as far as DIY projects go.  The first step was ordering the electronic parts, including the Monitor.  We gifted our teen with these items for Christmas. Then after Christmas they went to work building it.  The wood came from our local hardware store.  The computer inside is a RasberryPi. The instructions we used to make it came from Medium.com. 


After the cabinet was built we stained it with Black Wood stain and sealed it with Polycrylic.  

Electronics
20 Hikig LED Push Buttons & 2 Joysticks
2x Easyget Zero-Delay USB Encoder
27” Acer Monitor
Raspberry Pi 3
USB Speaker
Keyboard
Mouse
Hardware
2x MDF wood 3/4” x 49 x 97”
2x Inset overlay clip hinges
8 x 5/8-inch Particle board screws
L-brackets for support
3” Caster wheels w/ brakes
Mailbox lock for the cabinet
1 1/2” Nails
Wood glue
10” x 18” Sheet of Plexiglas
5 cans of flat black primer
5 cans of black gloss paint
3 cans of pink spray paint
1 can of fluorescent yellow spray paint
Tools 
Circular saw
Jigsaw
Drill press with varying Forstner bits
Router
Orbital sander
Milling machine
Cordless drill
Wood clamps


My son did most of the electrical work.


We can honestly say the whole family enjoyed this cool gift!


Will reference this link as we pretty much followed it to a T. 
 Arcade Marque Decal

Sunday, April 27, 2025

Painted Queen Anne Chairs

I titled this one Back to my same ol' BS because a long time ago I frequently painted furniture. And I know it's so controversial! I get it!  And I totally agree that certain wood furniture, namely Antique furniture, high quality wood furniture, heirloom furniture, etc. should remain untouched. Or at least maintained so it lasts forever.  Certain furniture though, in my opinion is worth giving a makeover. In this case, I found these chairs for $10 a piece at a local online auction house.  I didn't know if they have a maker, in fact I couldn't locate a single name on any of the chairs. So I took that as a "go" for me bringing them a new life. 


As you can see, there was some wear in certain areas and I loathe the existing fabric. I'm just not a primary colors kind of person. The style is Queen Anne but almost with a unique top part that flares. 


And of course, I went to work ordering paint and new fabric.  I was excited to try Anne Sloan's Paris Gray as a base coat and Old White as a top coat with clear wax. I ordered three yards of Waverly Regency fabric from Fabricguru.com. And as much to my surprise when I started to carefully take apart the chairs and take off the existing fabric I found the original label. Statton Furniture, made in PA.  My research suggests these are very nicely made chairs indeed and are considered Heirloom quality to be passed on to future generations. I really started second guessing my need to redo the entire chair.  But I had already ordered my paint and Anne Sloan Paint is not cheap!  Anyway, they are still the same quality chair only now with a French Flare! 

This time around I thoughtfully removed each chair cushion using a flat head screwdriver and pliers and laid each set down in an order so that they could be placed back on the same chair later. Thankfully the batting underneath and black bottom fabric were all in great shape so I just needed new top fabric. The fabric is upholstery grade and it was really helpful to have an electric staple gun to get this job done. I carefully used the old fabric as a stencil and traced the exact size onto my new fabric.  I used fabric sheers to cut out the fabric and then stapled around all the sides making sure my pattern was straight and the corners were tight. 

I used the old black fabric back on bottom and that's pretty much it! Now for the fun part. The painting!


Anne Sloan paint says you don't need to sand or prime or anything, but I am old school so I like to give my surface a good sanding and then a good cleaning with a strong solvent.  Then I clean it to get all the dust off. In this case, I used one thick coat of Paris Gray and let it dry for a few hours. Then I used a lighter coat of Old White. I let that dry overnight.  In the morning I applied a coat of clear wax and let that dry for one day.  Then it was time to lightly sand so that the gray peaked through a bit. In my opinion, if I ever do this again, would be to sand before waxing, but I was following their instructions. Once I was happy with my sanding, I applied another coat of wax. I again let it dry over night.  The final day of this project was reattaching the chair pads with the four screws at the bottom using an electric drill. 

I think it's the season, but I especially love to lighten things up around this time of the year. Who knows, by Fall I may be taking out the black chairs again!  Oh! and with my three yards of fabric, I even had enough left over to make a wide runner for the table. Maybe a little too wide, oh well. 


Someone likes hiding under the table, I wonder if he notices the new chairs! 


 Happy Spring. I better do a garden tour soon as I have so many new plants this year! 

xo

Cathleen

Saturday, September 28, 2024

DIY Halloween Reaper

We made a new guy to creep our front yard.  He turned out pretty cool.  A stone-like Grimm Reaper to haunt our cemetery at night. Below you'll find instructions to make your own.  It was pretty straight forward to make, but make sure you have two people to help drape the fabric.


Supplies:

For the body:
One foam head (from craft store)
About 12' of 1" - 1 1/2" PVC pipe (Habitat for Humanity Restore had plenty, for cheap!)
Either an umbrella stand, or 6 feet of PVC that is one size larger than used for the body
Two 90 degree PVC elbows ( shoulders) and one cross fitting for neck
Optional but recommended: Two 45 degree PVC elbows (gives a more realistic shape to arms)
PVC adhesive (to glue PVC pieces)
Hacksaw (to cut PVC)
Chicken Wire
Foam Pool Noodles or foam insulation from the plumbing section of hardware store

To make the coverings for the reaper:
5 yards of Gauze fabric or 1 Gray King Sheet for cloak 
Two yards of canvas fabric for shawl

To make monster mud (enough for 3-4 reapers:
 One five gallon bucket (mixing bucket)
1 gallon of Black paint
5 gallons All Purpose Joint Compound
Optional but recommended: Mixing bit (find it in the painting section)
Thompson's water seal for masonry (waterproofing)

Plastic Sheeting for ground to protect your surroundings

Build your prototype: 

We went very minimalistic with the body shape, just using 90 degree elbows for the shoulders. With the next reaper, we will also use 45 degree elbows for the...elbows. If you don't have pool noodles lying around, the plumbing section will have nice foam pieces to bulk up the arms.

After cutting and dry fitting the PVC, follow the instructions for PVC adhesive to glue the pieces together, posing as you want it (will it be holding a scythe? a Lantern? Just standing ominously?)

Use the chicken wire to provide a rough body shape. Pay special attention to the shoulders and clavicle area, as the PVC looks too blocky if you don't provide some curves.


Dry fit the clothes to get the look you want. We used lots of safety pins to get the shape right, it took a couple of tries. In the end we just cut a hole through the sheet and draped most of the sheet over the front, and pinned folds around the back to give a more streamlined look.


Prepare for some heavy lifting, as you prepare to apply the "monster mud", which is just a 5:1 mixture of all-purpose joint compound to the cheapest black or grey latex paint you can find. 6 gallons will be enough for at least three full sized reapers, or some other Halloween projects. Now is a good time to make sure that your PVC form is very stable; otherwise it'll tip right over when you lay the mud-soaked sheets on the body.

To prepare monster mud, pour about 2.5 gallons of the joint compound and 0.5 gallons of the paint into a new bucket.
Mix the joint compound and black paint in a large bucket and mix with mixer attachment on your drill.


Now you can dip your first sheet layer (the robe) into the monster mud. Dunking the entire sheet in the bucket won't work; instead dip piece by piece, then sandwich the pieces together to quickly and efficiently spread the monster mud. Remove as much as you can from the sheet to reduce the weight, but it will still be quite heavy.

Now lift up the sheet and carefully place it on the body form. Adjust the layout, and try not to tip it over. Then wait. Let it dry out overnight, then adjust the layers to give a more robe-like appearance, pinning up the ends around the back. Add folds and creases to give a more detailed appearance, and allow to dry for a few days.

After the first layer is mostly dry, repeat with the second layer (canvas or gauzy cloth). This will be lighter as it is smaller in area, and doesn't absorb nearly as much monster mud, but be sure that this won't tip over your reaper either! Then wait again.

After a few days, the monster mud should be dry, and it will feel like papier mache. Apply a nice layer of water seal over everything exposed, to protect against bad weather.

To mount on your lawn, you can either use an umbrella stand, or you can just drive a 6 foot piece of PVC pipe that is barely larger (internal diameter) than your reaper body (external diameter), about 2 feet into the ground. The reaper will slide right into the PVC piece and lean eerily.

Add filigree like a solar powered lamp, glowing eyes, a scythe, etc. 


When night fell, we think adding a little solar spot light will help illuminate him at night.  Can't wait to see if people think he's real on Halloween night. 

Happy Haunting!  🎃

xo
Cathleen


Thursday, June 15, 2023

DIY Candles

I have been saving old candle jars for a little while now. They are far too pretty to toss into the recycle bin.  At a recent trip to the craft store Michaels I found candle making supplies. I had wanted to make candles but didn't really know where to look for supplies.  So I purchased their Beeswax, wicks, wick positioning tools, and wick holders.  When I was finished I learned that I needed way more than a 2 Lb bag of wax.  So I finished about three of the candle jars and will have to buy more. 
So here is the process I tried.


The first step is to clean out the old jars. There are several ways to do this.  I scraped out as much of the wax as I could with a butter knife.  I boiled some water and poured it into the jars to melt the residual wax and then let it cool so the wax forms at the top of the water.  Then I used paper towels over a flour sifter to drain the water but keep the wax from going down the sink drain.  After that I gave the jars a scrub with hot soapy water. 

This photo shows the beeswax, oils, wicks, wick holder, and wick positioners. All from Make Market at Michaels. 


This two pound bag makes two medium size candles. 


I was a little worried the oils would be synthetic fragrances and give me a headache but they actually smell pleasant and give off accurate scents.  This set included all four fragrances, Peony, Fresh Sage, Gardenia, and Rose. 


This Christmas jar is one of my favorites and I will have to look for a Christmas scented oil to use. 


For the wicks, I cut them to size and used pliers to clamp them into the holders.  I used hot wax that I dripped at the bottom of the jars to keep them in place. You can also used adhesive. 


The wick positioners only worked on my smaller jars so for the larger sizes I used a chop stick to hold the wicks in place.


These seem much better at holding the wicks upright. 


The wax was melted in two ways.  I tried the microwave method, using a Pyrex jar and a double boiler.  One advantage of the microwave is that I was melting the wax directly into something I could pour the wax out of. The double boiler had the advantage of melting a greater quantity of wax.  I made sure to pour the wax into the candle jar that was placed in the sink just in case I spilled it.   I decided to pour the wax into the pyrex jar instead of into the jar so I wouldn't make a mess.   I added the scented oil once the wax was melted and used half of the jar of oil per 1 pound of wax.  The color of the wax stayed nice and white. 


I am happy the way it turned out and happy I can reuse the jars.   But like I said earlier, I am going to purchase about six more pounds of wax to complete the rest of the jars. 


 xo

Cathleen

Sunday, February 5, 2023

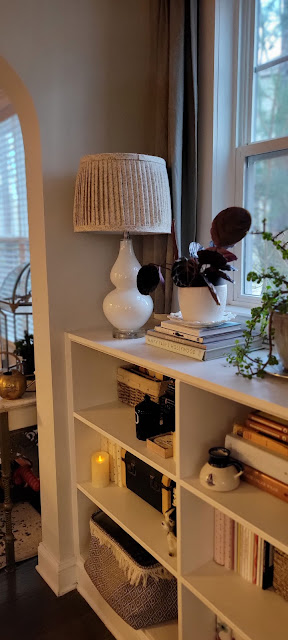
DIY Pleated Lamp Shade

Here's my attempt at making a Pleated Lamp Shade, like all the rage in England and Pinterest. Here was my first attempt using a Rose thrift store fabric.  It gives off a Shabby Chic vibe, not really what I was going for. Upon the first try I learned a few things. First being that my pleats were too big. Secondly that wrapping the excess fabric around the top and bottom left for a messy finish from the inside. And if you're sitting at the right angle you can definitely see the inside. So because I used hot glue, the fabric and trim came off easily.  I have outlined a tried and true method for creating a beautifully finished Pleated Lamp Shade below.

My trial Lamp Shade

Here is the Lamp Shade that turned out better. First pick out a lamp shade that you already own or find another one better suited for your lamp at a Thrift store. It's easy to remove the existing fabric, or do what I did and just leave it there. You still get plenty of light shining through. Next find a cotton fabric that is light weight in a non-fussy pattern. No stripes! That is a nightmare to line up.


So to begin you should get about 3 yards of fabric, and then pin it on both sides after making your folds. Some people skip this step but it ensures you are evenly pleating and that it's straight up and down. 


After you are done pinning, trim off the excess fabric using the edges to keep your scissors straight.  Then take your hot glue gun and run lines around the edges and press down the fabric to the shade.  Remove pins one at a time while also adding a dot of glue to the folds. 


Next create two strips with your fabric and make something similar to bias tape. Using your iron fold in both sides and press.


Then using your glue gun again run a line around the bottom and press your strip down for a finished look. Trim off any string or fabric that sticks out. 


So there you have it. Pretty easy DIY project that gives you that English look for about $30 for two lamp shades.


xo
Cathleen


Wednesday, October 19, 2022

Painting a storm door

I decided to give the front door a fresh paint job. It was a dark slate blue to start and I was trying to match it with a color I already had.  This color is a bit more teal but I love the way it turned out.  I replaced the door handle as well and decided to give the storm door the same color. I think it looks better when both doors match.

The original storm door was painted black. It felt like too much of a contrast with the white trim.  The new color is Narragansett Green by Benjamin Moore in the Exterior Soft Gloss Ben Paint.  I sanded the door using 200 grit sand paper and then cleaned it. I taped both the door and the glass off with painter's tape. After that I primed the storm door with Zinsser 1-2-3 Primer.  I let the Primer set for 24 hours and then I did two coats of paint the following day. 


I love the new color so much. I think it's going to look great year round.  

The new door handle is from Lowes and it's called the Baldwin Prestige Torrey Pines Venetian Bronze Smartkey Single-Cylinder Deadbolt Entry Door Handle. How can we go wrong when Joe and I lived in Torrey Pines in San Diego.  Names really have symbolism to me and I always take them as signs.


We have some freezing cold temps over the next few doors so this will remain closed! ❆ 

xo

Cathleen

Related Posts Plugin for WordPress, Blogger...
 

©Copyright PeaHen Pad 2010-2025. All Rights Reserved.