Showing posts with label Woodwork projects. Show all posts

Wednesday, June 18, 2025

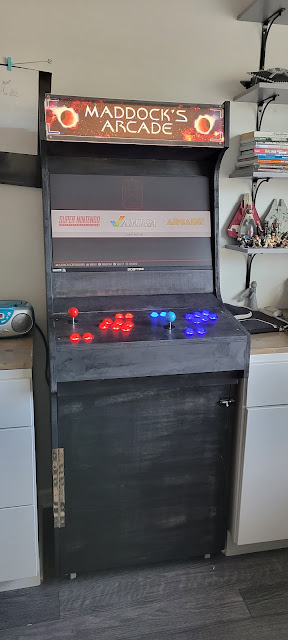
DIY Arcade

Last Christmas was pretty well spent at home making stuff.  The boys had a good time working on one of their Christmas presents with Dad.  A custom Arcade.  It was a pretty long project as far as DIY projects go.  The first step was ordering the electronic parts, including the Monitor.  We gifted our teen with these items for Christmas. Then after Christmas they went to work building it.  The wood came from our local hardware store.  The computer inside is a RasberryPi. The instructions we used to make it came from Medium.com. 


After the cabinet was built we stained it with Black Wood stain and sealed it with Polycrylic.  

Electronics
20 Hikig LED Push Buttons & 2 Joysticks
2x Easyget Zero-Delay USB Encoder
27” Acer Monitor
Raspberry Pi 3
USB Speaker
Keyboard
Mouse
Hardware
2x MDF wood 3/4” x 49 x 97”
2x Inset overlay clip hinges
8 x 5/8-inch Particle board screws
L-brackets for support
3” Caster wheels w/ brakes
Mailbox lock for the cabinet
1 1/2” Nails
Wood glue
10” x 18” Sheet of Plexiglas
5 cans of flat black primer
5 cans of black gloss paint
3 cans of pink spray paint
1 can of fluorescent yellow spray paint
Tools 
Circular saw
Jigsaw
Drill press with varying Forstner bits
Router
Orbital sander
Milling machine
Cordless drill
Wood clamps


My son did most of the electrical work.


We can honestly say the whole family enjoyed this cool gift!


Will reference this link as we pretty much followed it to a T. 
 Arcade Marque Decal

Tuesday, September 19, 2023

Laundry Sink Addition +Makeover

I was at the thrift store about a month ago and found the cutest hanging chandelier for only $15.  I googled it and found that it was selling online for around $400.  I mean come on.  I didn't have a place for it, but after careful consideration decided that I should put it in the laundry room.  Well, then it tail spinned into a complete laundry makeover. Isn't that always the case. You never know when inspiration will hit so these projects are hardly ever planned.  At the bottom I detail sources for items. But overall, I painted everything, including the ceiling, added beadboard wallpaper, wall storage, a new laundry sink and faucet, rug, window trim, custom cafe curtains, and accessories.   

AFTER


BEFORE

BEFORE

AFTER

The sink is a kitchen/laundry sink found at the Restore for a steal! We added a beautiful English inspired faucet and we custom made a counter and backsplash using birch wood with a faux Soapstone finish, tutorial I followed below.    We changed the undermount rod to a brass one and added acrylic clear hangers.


I took down the peel and stick wallpaper and put up beadboard traditional paintable wallpaper.  The cabinets and upper trim were all painted in the same color.  I am in love with the traditional English Brass faucet.  It was originally designed for a bathroom sink so we had to purchase a larger drain size when we hooked it up.


The upper cabinet door handles got a fresh coat of gold spray paint as well. Much cheaper than replacing them.


We added craftsman trim around the window which made a huge difference. I mounted a brass cafe curtain rod outside on the frame and sewed curtains with a french pleat in a Waverly french toile fabric.


I didn't spend a lot on accessories since I planned to pull blue delft or pottery from around the house.  I gave the chandelier a good cleaning and painted it champagne gold. Originally it was silver. We added LED candelabra lights and installed a dimmer switch. It turns out six light bulbs in a laundry room can be quite bright!


The light switch is Vintage Delft and it fits the new dimmer. 


I was pretty happy to find a runner rug that fit the space and brought a richness to it. It's a Vintage looking Scandinavian design in a flat weave. 


A great feature of the laundry room is now the freed up floor space. We found a wall mount Ironing Board rack to get that off the ground and also a wall mounted drying rack. Before both were on the ground and used up quite a bit of space.


Okay now back to our regularly scheduled laundry program!

Here is breakdown of room items, plus cost.
Paint on Cupboards and beadboard - Sherwin Williams Semigloss in color Rock Bottom - $45/gallon
Wall and Ceiling Color - Eggshell Valspar in Reserved White $45/gallon
Wood Trim for Windows -$100 Sherwin Williams in color Celedon (already owned)
Sink - Elkay Quartz Classic 25" x 22" Single Bowl Drop in Greystone Color, I paid $60 new
Bottom Cabinet Used from Habitat for Humanity Restore $75
Cabinet Pulls -From trip to Korea
Painted Upper Handles with Krylon Gold Spray Paint $7 x 3 =$21
Wallpaper Beadboard from Lowes $25
Vintage Ornate Porcelain Putter 6 ARM Candle Stick Light Fixture, Made in Spain $15
Vintage Painting $40
Glass Bowl with dryer balls Home Goods $12
Baskets from Home Goods Large $25, Medium $20 Wall Basket $14 
Rug- Garnet Hill $245
Faucet - English Vintage Style Single Handle Centerset $233
Wall Mount Iron Rack - Wayfair $18
Birch Wood for countertop $40
Faux Soapstone Paint Supplies $40 Followed this tutorial
Towel Bar Lowes $30
Curtain Fabric - Waverly Toile Ebay $60
Brass Cafe Curtain Rod from Rejuvenation $75
Brass Cafe Curtain Clip Rings Ebay $15
Delft Vintage Switch Plate Ebay $25
Plumbing for Sink plus tools $230
Acrylic Hangers $75
Grand Total Makeover - $2,176 (and cue the frown from Joe after I said the whole thing would only cost a couple hundred dollars.  Although if I put a positive spin on it, I saved tons on the sink, light fixture, and art! 
P.S. Make a budget beforehand.


Saturday, March 12, 2022

Guest Room Makeover

Sometimes literally the only reason I start making over a room is because I get a silly idea in my head like "Let's make a Murphy Bed! It will be fun!"  Haha No. It was a lot of work.  But the results came out pretty fun and the guest room became a whole lot more functional. I can put the bed up and when I save enough money I can throw a pretty rug and desk in the middle and it can also function as a work space.  Before we got started some may remember this room had beige carpet, beige walls and some furniture that we either sold or repainted.  The only thing that stayed was the dresser that also got a makeover. 


A reminder of how the room looked when we moved in:


 Now we have this beautiful room that can be a guest room or an office. 

To start out this room makeover I found this beautiful wall and bookcase color called "Sulking Room Pink" by Farrow and Ball.  I loved that it was a sophisticated and warm pink. It feels grown up. We added picture frame molding to the walls and I painted the walls with an Estate Emulsion and the Trim and bookcase Modern Eggshell.  That way there was a sheen to the trim work that stood out from the walls. 

The bookcases were thrift store finds that were scratched and damaged but were a score at $20 each. They have working lights which is great. I gave them a makeover with pretty wallpaper called Ferrandi  Blue by Christiane Lemieux for York Wallcoverings


The Murphy Bed kit was from Amazon and came with very detailed instructions.  You buy all of the lumber separately and I can do a blog post on the details of how we built it. All of the bedding we had on hand but the sheet set is new from Lands End. It is the softest flannel I have ever felt! It's 400 count Supima Cotton and I highly recommend it. 


A touch of gold monogramming never hurt anyone. 


It definitely feels more modern and gives the ceiling a taller look when you paint the crown molding and base molding the same color as the walls. Just use that shinier paint so you can clean it more easily. 

We replaced the hollow core door with a solid wood door and it makes all the difference when opening and closing. It feels sturdy and keeps the sound out. I used the same crystal door knob from Nostalgic Warehouse. 


I kept the original chandelier but removed the crystals. I'm still unsure of whether I will keep it long term. But it works in here for the most part.  The drapes are double wide linen curtains from Pottery Barn. They used to hang at our patio door but work better in here. 

The vintage french dresser got a makeover as well. It used to be white but I thought it would look more grown up in black.  The color is called Paean Black by Farrow and Ball. It pairs so nicely with the wall color. I've had these crystal lamps forever and they are really suited to this space. The mirror adds a bit of coastal whimsy and the contrast is nice. 


Depending on the light the dresser can take on a purple or black color. 

An old painting of sail boats that I had fit so perfectly in here. And the two vintage suitcases plays nicely with the stain on the murphy bed.


The outside of the door was stained with four coats of Minwax Polyshades Oil Based stain in Slate.  I can honestly say I wouldn't use this product again. I would use a regular stain next time with Poly on top.  It was splotchy and dried unevenly every time. Thus the four coats.  Sometimes you live and learn. 

The Brass Peacock door knocker was sort of a last minute touch. Getting a solid wood door means you can have heavy pieces like this.  

And a brass modern robe hook on the inside let's guests hang their coats, robes, or purses easily. 


Here is the murphy bed closed! This blog post is getting very long so I can do a separate post on just this, but we love how it turned out. We even added picture frame, crown, and base molding to the outside. 


The handles are made of iron and brass from Anthropologie and give it such a built in armoire feel.

And I can't forget that we added new Herringbone Laminate Flooring from Lumber Liquidators.   We had a few issues of damage to some of the pieces so had to go back and get more which was kind of frustrating but we are happy with the way it turned out. 


Now that the pandemic is coming to an end (fingers crossed!) we hope to have some guests stay with us. 


xo
Cathleen


Tuesday, February 16, 2021

Men's Closet Makeover

I was lying in the bathtub about 2 weeks ago and the view is straight into Joe's closet.  It wasn't a very good view to say the least. There was the beige carpet, the wire shelves, disheveled clothes, extra flooring from our old house shoved in the back forcing other things to get pushed forward. There was also the view of the horrible florescent light fixture.   Now it looks like this!  Behold! The coolest DIY project ever. Those ceiling tiles.  All of the sources are linked at the end of the blog post.


Here is the BEFORE when we first moved in.


And here is sort of what the state of the closet was in the present. Joe was using a blue bin to store summer clothes and using a red suit case with broken zippers.  I removed everything from the closet and forced him to sort the items he no longer wore.  He only got rid of a few items, including a beautiful pair of blue suede shoes he never wore because they were too big.  I got to work ripping out the carpet, painting the walls and making wooden shelf facades in order to keep the wire shelves. 


I used up the old flooring which saved some money and paint we had used in our pantry.  Joe helped me remove the florescent light and we added this beautiful brass school house fixture.


The ceiling tiles were definitely an experiment. I have never put up these before and learned a few things along the way. I started at the center to align the light fixture in the middle of the tile.  But looking back I kinda wish I started at the farthest wall so I didn't have to make so many extra cuts. I painted the tiles once installed and attached them using Command Velcro strips and some liquid nails.  I also caulked the seams.  


Joe now has a great place to store out of season clothes, in these cute gray fabric bins with rope handles.


His door was also painted prior to me starting this project and I added the milk glass door knob. 


Joe already had these vintage wooden pant hangers in this blonde wood color so naturally I purchased shirt hangers in the same color and decided to leave the shelves in their natural state. I just added a coat of Polyurethane. 


I am so in love with this old school fixture.  


No this is not a refrigerator. It just pretends to be. I scored it brand new for $50 at the Habitat for Humanity Restore.  It provides great storage for accessories and travel supplies. 


A proper tie holder was a must needed accessory organizer. I love that Joe can now hang them and they will stay ironed.


Sweaters should always be folded so instead of buying soft hanging baskets that would eat up valuable hanging space I decided Joe needed a bookcase to store them.  This was fun to build and turned out so  well. 


The door knob is so beautiful. It's made of solid brass in an oil rubbed bronze finish with a milk glass knob.

This little detail was something I came up with.  I thought it was to provide more stability when I connected the face trim pieces to the shelves. They are actually brass hinges.  We used nails to connect the pieces so these hinges are purely decorative. 


I found a cute "J" hook at Anthropologie and it's a great place to hang his robe. 


And now for some gratuitous ceiling shots. 


This project entailed everything I'm good at -organizing, color coding, painting and filled my week keeping me busy during the pandemic.  I will now be twiddling my thumbs until I come up with a new project.  Hope you like it. 

Sources
Coat Hangers -  Top Line
Gray Fabric Bins - Storageworks
Tie Hanger - Ohuhu
Belt Hanger - Ohuhu
Ceiling Tiles - A La Maison
Similar Wood Flooring - Dutch Barn Oak
Wood for Shelves- Home Depot
Light Fixture - Lamps Plus

xo
Cathleen


Related Posts Plugin for WordPress, Blogger...
 

©Copyright PeaHen Pad 2010-2025. All Rights Reserved.