Monday, October 31, 2011

Happy Halloween!

It's not Halloween unless we're listening to spooky music, have a fog machine, and throw a party.  The Possessed Pearsons threw it down at the Pearson Purgatory last night and invited of our neighbors. We had 22 adults and 14 kids.  Before the party we decorated with garland, lots of spider webs, and lots of Halloween themed decorations.

We played classic horror themed songs, 80's classic new wave halloween songs, and of course Thriller. It was a pot luck, and people brought yummy food. We had mac and cheese, salad, pizza, chips and dip, pasta (fingers included!) salad, fruit, and veggies. For dessert I made a graveyard cake:


and ghost short bread cookies:


We changed all of our light bulbs to colored lights. In the dining room we had green lights and in the kitchen we had red lights.  See the ghosts? Those are cheese cloth ghosts hung from fishing wire.


I made an autumn punch that included several types of juices and RUM optional! We also served Bloody Mary's and screwdrivers. We added dry ice to that glass juice container to make a bubbling effect.

Here is CAP dressed as a Ninja and MVP dressed as a little Ninja:


 I am a dragon Geisha!


Here are muno, Jessy, and Woody from Toy Story.


Here's our neighbor Jeff showing MVP a few moves.

The kids enjoyed playing both inside and out.  For activities Joe made a science lab of touch and feel things. We had "ogre brains," "witch eyes," "rat intestines," and "maggots."  The kids enjoyed putting their hands in and feeling.  I also had two big pumpkin cardboard cut outs outside for a bean bag toss. Some of the kids enjoyed playing with this.  When it finally got dark outside, some of the kids grabbed flash lights and wandered around the back yard playing a monster game. They were all screaming and running around like they were being chased.

We had a great party.  We hope you had a great Pre Halloween weekend too.

xo
Cathleen

Friday, October 28, 2011

I just wanted a clean bathroom

So my only intent tonight (Wednesday) was to disinfect and clean our hallway/guest bathroom. Then it turned into something WAY more. After scrubbing the toilet, scrubbing the counters, floors, mirror, blah blah I looked at our cabinets and realized they could use another coat of paint. You see, a LONG time ago we had one of those wooden kid stools that our kids could climb up on to wash their hands. Every time that thing got pushed up against our cabinet it left paint marks. After a while there was a big tan splotch of paint across one of them. That thing went into the attic as soon as my 2 year old slipped off of it hitting his chin on the way down and put his tooth through his lower lip. So like the crazy woman I am, I checked our paint cabinet and we were well stocked with white semi-gloss interior latex paint so I grabbed a can and a brush. I had already washed down the cabinets.  So I went to work undoing all the hardware and giving them a nice once over with the paint.


Close up!


Then I looked at the door. OH Gosh, that needed painting too. So that got a coat of paint also.  I seriously have issues.  Besides it seems to be counter productive to be cleaning and painting when Halloween is just around the corner. Isn't my house supposed to look gross and scary?  Well I guess I can dim the lights so everything doesn't seem as clean and freshly painted as it really is. Muah haha


On a related note to the hallway bathroom, while I was cleaning it, I thought that it's high time we framed out the mirror in there. We're no stranger to framing out mirrors (more on that later) so I headed to Lowes Thursday morning and found some pine trim on sale for $5 for a 7' piece. I bought two of them.  I'll be working on that project this weekend, along with a myriad of Halloween preparations for the PARTAY on Sunday at the Pearson Purgatory. We decided a long time ago that buying two mirrors would look nice since we have double sinks in there, but the way the mirrors would line up, they wouldn't be directly over the sinks and it would look awkward. So having one large mirror suits this space better. And I'll be happy to see those plastic mirror holders covered up.  Not sure yet what color I'll paint the frame. I'm leaning towards ORB, because a white frame would get eaten up against the light colored walls. What do you think?

Have you started a cleaning project that went way beyond what you had in mind? Did things spiral out of control into an organizational hay day? It always seems to happen to me, even if I only have a mere 20 minutes before one of my favorite television show starts and I still need to shower! 

xo
Cathleen

pssst. UPDATE - The 7' pieces of trim ended up being too short, so now I have to go back to Lowes to exchange them for 8' pieces. You know the story. One project takes at least 3 trips to the hardware store. I never learn. Measure twice, cut once. 

Thursday, October 27, 2011

DIY compost bin

We are all about recycling and reusing stuff at Casa De Pearson, so when it came to food scraps what better way to recycle than to have our own compost bin. We looked at several types online to buy and to make and realized we'd get a much bigger one and better one if we made it ourselves.   We love the fact that our old veggie/fruit/egg shells/coffee grinds/etc. get a new life as deep rich soil to use in our garden. Plus we're saving money on store bought soil/compost.  It's a win win situation for us and the environment.  

First we scoped out a place for it in the yard.  We wanted it away from the house and in the sunlight, but not so far away that it would be a trek to get to it. We ended up plopping it in the back corner.
We have a metal composting container on our kitchen counter for the scraps and we empty it about every 4 days. It has a filter in the lid to contain odors. We haven't had any issues with it so far. We leave an old shovel out with the the heap to bury the fresh scraps. 

Here are details on supplies and instructions on building it.

2  4"x4"x8' pressure-treated posts, each cut in half (hardware store will do it for free/cheap)
12 1"x6"x8' pressure-treated boards, each cut in half
2" wood screws

We leveled a 4' x 4' patch of ground, dug 6" into the ground at each corner, then put each 4"x4"x4' post in those holes, and pack the dirt so the posts are somewhat stable. Then just attach each 1"x6"x4' board to the posts using the wood screws (pre-drill the holes to make life easy). We built the front two planks high, we might add another if our compost volume gets too high. 


Here is a view from the other side of the fenced in area. As you can see it blends well with our fence as it's the same color. We also had the open part facing outward so more sunlight would hit it. Thus making the contents break down faster.


Our kids love this compost bin and finding worms from around the yard to add to it.  We have seen several worms get pretty big from all the food. When you're using your compost bin, make sure to add equal parts brown material (i.e. leaves, dirt, grass clippings) with your food scraps. Then make sure to use a shovel to stir it up every week or so and to cover any food (otherwise you'll get lots of fruit flies and other insects.)  We haven't really had this issue, nor does it smell.

If you have your own compost bin, please share. We love ours, but probably could improve on the design.

xo
Cathleen

Wednesday, October 26, 2011

Fall fun on the farm

We spent Saturday morning at Green Level Gourd Farm in Cary. It was about 25 minutes away and a lovely drive.  We were pleasantly surprised when we got there because it had more to do than we thought. They had a corn maze (CAP loved this!,) animals, pumpkins, a hay ride that was quite fun for the kids, face painting, and a huge play area for the kids. This is a family-run farm and was authentic.  We'll definitely make this a family tradition (for as long as we're here!)

Here are the boys in front of the corn maze:


A lovely old red barn:


This is right outside the red barn and E.claire is wondering who those two guys are behind them!


This looks Tim Burton-ish. I could try making something similar for next year.


Me with all my little ghouls on the hay ride.


It was a gorgeous fall day. The trees are starting to change color and the sky was really blue.


This is the house of the farm owners. It was all decked out for Halloween.


These photo booths really cracked me up. At first MVP (the child on the far left) put his head through the front of the hole. We had to explain several times to stand behind it and look through.


Another awesome photo-op.


My baby cakes looking right at home on the farm in those overalls.


What have you all been up to this Fall? Any special trips to the pumpkin patch? Any good farms around your area?  We hope to get back to this farm again soon. The kids had such a blast.

xo
Cathleen

Tuesday, October 25, 2011

DIY door window curtain

When we first moved in all of our windows were covered with plastic white mini blinds. Let's just say they weren't really our thing. They were perfect for the bathroom since they don't get moldy and they are relatively easy to clean, but the rest of our house got window treatments in the form of curtains or wood blinds. I'll go into detail on that one later.  Here's our back door window. We bought a simple cafe rod that was under $5 at Target and drilled holes on either side to attach the brackets. I used this fabric from a left over project (more on that later too.)  But it's outdoor fabric I bought online at fabric.com.  Let me tell you that I have absolutely no sewing skills what-so-ever, only sewing buttons back on shirts by hand.  I really wanted a curtain made out of this fabric, so I got out a needle and thread and tried my hand at stitching the edges shut.  I simple cut out enough fabric to cover the window and started sewing around the edges. For the loop at the top I just sewed a hole big enough for the rod. And voila! Easy curtain.  Oh and that tie is my grandmother's vintage leopard print scarf. Adds a hint of glamour don't you think. Oh and Nate Berkus says animal prints are back in style for the home. Do they ever really go out of style?


We hardly ever keep our curtain in this untied position, but here is what it looks like when we don't want peeping toms in our backyard.  It's not as pretty when it's down as you can see because this fabric wrinkles. You can probably use polyester fabric to prevent this.


Hope you enjoyed this mini window makeover!
xo
Cathleen

Monday, October 24, 2011

Vintage Blanket Rack

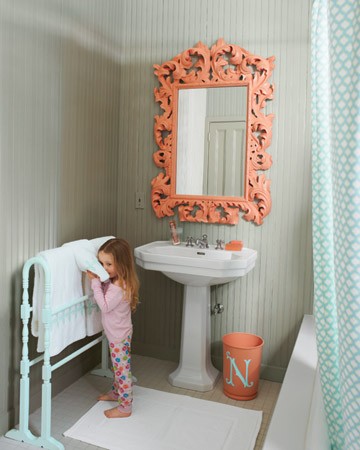
When something lands on your doorstep for you to see, that's not exactly your cup of tea, you work with what you got, especially if it was free! Oh Yeah, I can rhyme too.  A lovely neighbor of mine was giving away some things and I immediately saw some potential.  Of course I jumped on the internet to see if I could find an example of what I was thinking in my head and found this:


I'm so in love with this bathroom!  I love everything about it. The pedestal sink, the shower curtain, and that gorgeous coral mirror.  But do you see that blanket rack? I was really inspired by it's double use as a towel rack in the bathroom, but also by the color.

So yeah, I busted out the ol' sandpaper and some left over spray paint from my dining room chair project, and went to work this weekend. It's still in the process of curing -but I was able to get a few snap shots of it in the nursery with some beloved hand-made quilts and one throw.


Here is what the blanket rack looked like when it arrived.  Not really my thing, but it was quality wood and very sturdy.


Here's another after shot for ya:


Here is where the inspiration photo came from.
Hope you all had a great weekend. We are enjoying this lovely fall weather!

Friday, October 21, 2011

Backyard landscaping

We still can't believe our backyard looked like this when we moved in. What were we getting ourselves into? Well let me tell you -we've been hard at work each and every season keeping the leaves, acorns, seeds, pine needles, etc. off of our ground. We have a LOT of trees. Which makes it wonderfully shady in the summer and when the leaves are gone in the Winter we get lots of sunlight. So I guess it's good for our utility bills and the environment, but it's more work than we are used to.  We've dug out several small trees and bushes, including an apple tree that gave us about 1 apple per year since the squirrels would get to them first.  It was also placed very awkwardly in the middle of our yard and growing sideways towards the sunlight.  We've pruned, trimmed, clipped, and mowed. Here are some photos of what our backyard looks like now. It's still a work in progress.

Here's the view from the left side if you're facing our house from the street.
BEFORE:


Here it is AFTER: that is our wood pile in the corner.


You can see that we took out that tree. The grass is a work in progress. With two little boys running around back there we have trouble growing it in. We're thinking about adding a stone walkway around the wooden deck where it's just dirt.

Here is a shot from our backyard looking at the house behind us.

BEFORE:

AFTER: You can see we removed lots of little shrubs and bushes. And even some more trees. Don't worry, there's still tons.

Gosh look at all the brush on the ground. Looks like a fire hazard back here.
BEFORE:


AFTER:


Here is the BEFORE shot where our future swing set would go:


AFTER shot of Swing Set:


Here is the view of the right side of our house if you're looking from the street (this view is facing the street.) There was a LOT of overgrown bushes on that hill. We removed a TON of juniper and pretty much everything else.
BEFORE:


AFTER: Our property goes all the way up that hill, but we decided not to fence in the hill (logistically it was going to be a pain in the you know what.) Our 5 year old son goes up there and plays sometimes.


BEFORE shot looking at the right side of our yard from the street:


AFTER: that wooden thing in the corner is the compost bin Joe built. We'll have a post for ya' on that one later.


We'll also have separate posts on how to build your own fence, making a compost bin, and the installation of that swing set.

Hope you enjoyed a look back at our backyard.  Now I've got to go rake up some more leaves.

xo
Cathleen

Thursday, October 20, 2011

Painted Nursery Bookshelf

Little bookshelves like this are all over craigslist. Just look in the furniture section under your city. This little number was $20 bones and the perfect size for E.claire's space in her nursery.  Here it is all finished.


Here is the bookcase when I brought it home. The nice girl that I bought it from lived just 3 minutes away so it was perfect. She even had a guy that was working on her house help load it for me.


I gave it the good ol' scrub down with some tsp. If you haven't heard of tsp, check it out at your local hardware store. This stuff is amazing at getting filth off. But just be forewarned that it will strip wood of it's clear coat. So don't use it for every day cleaning. Just use it if you're planning on painting wood, staining wood, or other projects like cleaning your brick fireplace.  After it was cleaned up I began to sand it with some 120 grit sand paper.  I used a tack cloth to remove any dust before painting. I always use an Oil based primer first because I find that it adheres the paint much better. But do this step outside or in a well vented area. This stuff stinks.

After it was primed I used an Interior Latex paint called "Polar Star" from Valspar in a satin finish.  I used two coats of this applied with a nylon brush.  Once it was all dried, I used three coats of Minwax Polycrylic Clear Gloss finish. I sanded between each step with a 220 grit sand paper ensuring that each coat adhered properly. I really wanted this piece to be durable because it would be in a child's room getting a lot of use.


I couldn't wait to get it in her room so I could finally have a place to store all those little toys and books. It's the perfect depth for the golden books. It's too shallow for larger books, so it holds all the baby board books and later on it will be great for some soft cover novels. I'm sure my daughter will get lots of use out of it.

Here is a side view where I just had to add a little decal. These are great because you can remove them and go with something else when the mood strikes.


Hope you enjoyed this little makeover.  Now go and paint something. It's easy. You can do it.

Wednesday, October 19, 2011

Put a bird on it!

Fred Armisen and Carrie Brownstein, inspired by the dress-up station.

E.claire's 1st birthday party

My daughter had her one year birthday party recently and I wanted to share all of the decorating and ideas with you. I had so much fun planning her party and started about a month in advance.  The first thing I made was this banner for her over the fireplace.  I was lucky enough to find pretty scrap book paper at the fabric store on sale for .25cents each. I bought 8 sheets of paper and cut out a triangle on the first one and then used that as a template to trace and cut out the other 7 triangles.  I used some left over gray craft paint to paint the letter's of her name on each one.  After it dried I took it to the Fed Ex store to have each piece laminated.  Laminating is much more expensive than I would have guessed. It was $4 per sheet and I needed 4 sheets total.  I was happy though that the laminating turned out well and it can be cherished for a while.  When I got home I put two holes on either side of the top and looped some pink ribbon I already owned through each one.  Then I simply tied it to the nails already in my fireplace mantel.


The next thing I made were tissue pom poms for above the dining room table and one for above the fireplace.  The tissue was between $1.50 and $2 for a pack of 10 sheets. I bought most of the packs of tissue at the Hallmark store and a few packs from Target.  I used a tutorial from the Martha Stewart website on how to make them. It was really easy.  I hung them up with ribbon and push pins.


Since my daughter had not yet eaten eggs at this point, I made Vegan white cupcakes with butter cream frosting for the guests. I also made her smash cake from the Vegan recipe.


Here is the spread. It included home made Eclairs (we affectionately call our daughter E.Claire since her first name starts with an E. and her middle name is Claire,) fruit, croissants, mini-donut holes, a toddler mix of cheerios, raisins, and rice puffs, and her smash cake in the middle of the table.


I made flower confetti for the table with left over scrap paper from my banner project.  I just drew a bunch of flowers and cut them out.  For some detail I put a drop of glitter glue in the middle of each one.


Here is her two-tiered smash cake (there's actually a third layer at the top.) The home made eclairs on the right and toddler parfait in the middle back.


We served our guests fresh squeezed orange juice in this glass container. We also had coffee and tea for the grown ups.


For party favors I found tea light holders at Michaels in a set of 16 and bought 3 bundles of flowers from the farmer's market. We used rocks we already had in our shed to fill them up.  I placed the flowers around the smash cake and each family took one home.  The kids got lollipops that I painted the letter "E" on.


And here is the birthday girl herself with her wonderful Daddy. Her hair bow was made using an old clip, 3 cut out flowers and some hot glue.


Happy First Birthday E.claire!
Related Posts Plugin for WordPress, Blogger...
 

©Copyright PeaHen Pad 2010-2024. All Rights Reserved.