Showing posts with label Painting projects. Show all posts

Saturday, January 27, 2024

Cottage Grove

I gave the Master Bathroom a little refresh over this past week by painting the cabinets a new color.   This green just spoke to me at the hardware store. It's called Cottage Grove by Magnolia Home.     


It was my first time using this type of paint.  I have to say, it has it's pros and cons.  The pros are that it seemed to level well and not show the brush strokes.  The color is beautiful. The cons are that it took me three coats to get it completely opaque.  The verdict is still out on how well it will stay on. I did sand the existing painted cabinets but I did not use a primer.   


The green cabinets really feel fresh in here and go well with my existing rose artwork.  I also updated the bathroom with a new rug and Green chenille mushroom stool.  


A new soap dispenser in a pretty pink glass and toothbrush holder add a bit more color to the counter. The black and white hand towels from Rachel Zoe are fun too.   I would like to save up and replace the faucets in this bathroom eventually and the light fixtures above the mirrors.  That is on my to-do list.


Seating in the bathroom, it turns out makes the whole space feel more cozy.  

xoxo
Cathleen

Tuesday, September 19, 2023

Laundry Sink Addition +Makeover

I was at the thrift store about a month ago and found the cutest hanging chandelier for only $15.  I googled it and found that it was selling online for around $400.  I mean come on.  I didn't have a place for it, but after careful consideration decided that I should put it in the laundry room.  Well, then it tail spinned into a complete laundry makeover. Isn't that always the case. You never know when inspiration will hit so these projects are hardly ever planned.  At the bottom I detail sources for items. But overall, I painted everything, including the ceiling, added beadboard wallpaper, wall storage, a new laundry sink and faucet, rug, window trim, custom cafe curtains, and accessories.   

AFTER


BEFORE

BEFORE

AFTER

The sink is a kitchen/laundry sink found at the Restore for a steal! We added a beautiful English inspired faucet and we custom made a counter and backsplash using birch wood with a faux Soapstone finish, tutorial I followed below.    We changed the undermount rod to a brass one and added acrylic clear hangers.


I took down the peel and stick wallpaper and put up beadboard traditional paintable wallpaper.  The cabinets and upper trim were all painted in the same color.  I am in love with the traditional English Brass faucet.  It was originally designed for a bathroom sink so we had to purchase a larger drain size when we hooked it up.


The upper cabinet door handles got a fresh coat of gold spray paint as well. Much cheaper than replacing them.


We added craftsman trim around the window which made a huge difference. I mounted a brass cafe curtain rod outside on the frame and sewed curtains with a french pleat in a Waverly french toile fabric.


I didn't spend a lot on accessories since I planned to pull blue delft or pottery from around the house.  I gave the chandelier a good cleaning and painted it champagne gold. Originally it was silver. We added LED candelabra lights and installed a dimmer switch. It turns out six light bulbs in a laundry room can be quite bright!


The light switch is Vintage Delft and it fits the new dimmer. 


I was pretty happy to find a runner rug that fit the space and brought a richness to it. It's a Vintage looking Scandinavian design in a flat weave. 


A great feature of the laundry room is now the freed up floor space. We found a wall mount Ironing Board rack to get that off the ground and also a wall mounted drying rack. Before both were on the ground and used up quite a bit of space.


Okay now back to our regularly scheduled laundry program!

Here is breakdown of room items, plus cost.
Paint on Cupboards and beadboard - Sherwin Williams Semigloss in color Rock Bottom - $45/gallon
Wall and Ceiling Color - Eggshell Valspar in Reserved White $45/gallon
Wood Trim for Windows -$100 Sherwin Williams in color Celedon (already owned)
Sink - Elkay Quartz Classic 25" x 22" Single Bowl Drop in Greystone Color, I paid $60 new
Bottom Cabinet Used from Habitat for Humanity Restore $75
Cabinet Pulls -From trip to Korea
Painted Upper Handles with Krylon Gold Spray Paint $7 x 3 =$21
Wallpaper Beadboard from Lowes $25
Vintage Ornate Porcelain Putter 6 ARM Candle Stick Light Fixture, Made in Spain $15
Vintage Painting $40
Glass Bowl with dryer balls Home Goods $12
Baskets from Home Goods Large $25, Medium $20 Wall Basket $14 
Rug- Garnet Hill $245
Faucet - English Vintage Style Single Handle Centerset $233
Wall Mount Iron Rack - Wayfair $18
Birch Wood for countertop $40
Faux Soapstone Paint Supplies $40 Followed this tutorial
Towel Bar Lowes $30
Curtain Fabric - Waverly Toile Ebay $60
Brass Cafe Curtain Rod from Rejuvenation $75
Brass Cafe Curtain Clip Rings Ebay $15
Delft Vintage Switch Plate Ebay $25
Plumbing for Sink plus tools $230
Acrylic Hangers $75
Grand Total Makeover - $2,176 (and cue the frown from Joe after I said the whole thing would only cost a couple hundred dollars.  Although if I put a positive spin on it, I saved tons on the sink, light fixture, and art! 
P.S. Make a budget beforehand.


Sunday, November 27, 2022

Quick Mudroom Makeover

Finally getting around to this small mudroom update.  The AFTER photo:


BEFORE

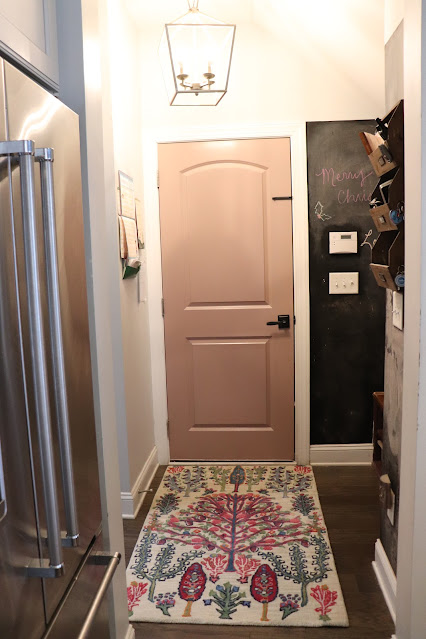
I painted the wall with Farrow and Ball Aubergine (same as in our daughter's room.) We made a seat out of a piece of plywood leftover from our Murphy Bed Project and added trim.  I spray painted the shoe bins tan with a stone finish.  We changed the hooks from the silver/chrome ones to new brass ones. 


The doors got a paint job in Farrow and Ball's Sulking Room Pink (same as in guest room.) We added a new door handle in Oil Rub Bronze from Lowes. The rug is an early Christmas present from Anthropologie called the Tuft Summit Wool Rug.


Here is a view with the lights off, the color on the wall gets much darker.


The coat closet got two coats as well. 


Hope everyone had a lovely Thanksgiving. I am stuffed!  And now that we are finally done with Christmas decorating I can get back to the gym!

xo

Cathleen

Wednesday, October 19, 2022

Painting a storm door

I decided to give the front door a fresh paint job. It was a dark slate blue to start and I was trying to match it with a color I already had.  This color is a bit more teal but I love the way it turned out.  I replaced the door handle as well and decided to give the storm door the same color. I think it looks better when both doors match.

The original storm door was painted black. It felt like too much of a contrast with the white trim.  The new color is Narragansett Green by Benjamin Moore in the Exterior Soft Gloss Ben Paint.  I sanded the door using 200 grit sand paper and then cleaned it. I taped both the door and the glass off with painter's tape. After that I primed the storm door with Zinsser 1-2-3 Primer.  I let the Primer set for 24 hours and then I did two coats of paint the following day. 


I love the new color so much. I think it's going to look great year round.  

The new door handle is from Lowes and it's called the Baldwin Prestige Torrey Pines Venetian Bronze Smartkey Single-Cylinder Deadbolt Entry Door Handle. How can we go wrong when Joe and I lived in Torrey Pines in San Diego.  Names really have symbolism to me and I always take them as signs.


We have some freezing cold temps over the next few doors so this will remain closed! ❆ 

xo

Cathleen

Wednesday, June 2, 2021

Summer Vibes Porch

My instagram poll was no help. I posted whether I should paint my porch railings White or leave Cedar and the pollers were split 50/50!  I let the season guide my choice as well as the style of my house and the balance of colors outside.  So it turns out White was the winner and I'm pretty happy about that choice. I spent exactly 10 hours yesterday priming all the railing, painting it and then staining the deck.  About a week ago I power washed everything and let it dry for two days. Then I sanded everything. Can anyone say Karate Kid?    My arms are sore and my back hurts but I love how it turned out. 

It has a very coastal feel now.  I will post more pics of the view looking from the patio below once I get the patio cleaned up.  I got rid of the big black rug and replaced it with this Bohemian Jute rug.  

For the white paint I used Sherwin Williams HGTV's weathershield in white. The Stain is Cabot Wood Toned Stain and Sealer in Heartwood.  The Primer is Zinsser 123.


I decided to clean up the table a bit by not cluttering it with too many plants. Now we can actually have our breakfast out here in the morning. The two blue and white throw pillows are new from Lowes. They are indoor pillows so I coated them with Scotchgaurd. 


Before starting the painting process I had to carefully remove my climbing rose bush but am happy to report that I was able to reattach it and I gave it a nice pruning since it had a lot of damaged leaves from a recent house cleaning where they used bleach. Never again!


This arrow metal shelf got a new paint job in Hammered Black.  


The little white table is a thrift store find and the basket on top serves as a great glass holder.

Well what's the verdict? Farm House Fresh? Country Coastal? Coastal Craftsman? I know there are people who would hate the fact that I painted the wood. But after reading so many websites that said either way, Paint or Stain, there is maintenance involved and stain doesn't last as long.  The stain that was on there previously was faded and dirty. Yes it's easier to stain, but in the end I think I like the painted look better.  Feels fresh and beachy.  

So here's the real interesting bit. I stained the stairs and deck skirt a slate gray.  My plan in the next week or so is to stencil a pretty pattern onto the front risers to give it a more dynamic feel. And from down below on the patio you only see white and slate. And only a hint of the wood deck color.  So there's not three colors competing.  Stay tuned for more deck photos next week!


 Happy Porch Sitting Days ahead!

xo

Cathleen

Saturday, March 6, 2021

Door paint and knobs

Keeping busy during the pandemic has been no problem. I am finding ways to stay sane and pass the time for sure! For example, I decided that all the upstairs doors needed new paint because the old paint was splotchy, chipped (darn dog!) and I didn't like the old door handles. Builder grade brushed nickel just wasn't my thing.  I wanted the doors to look old and vintage. 

AFTER

BEFORE

I decided on this cool paint by Behr called Ultra Scrub Defense in a Matte finish because apparently it looks like Chalk Paint with a flat finish but you can still clean it (unlike regular flat paints.)  I thought it might be bit risky but so far so good. It seems really durable because I have tried to personally scratch it off and I can't.  I chose this color called Silver Celadon because that was one of the Chalk paint colors that looked really nice.  I had the guy at Home Depot color match it. 


I painted every single door inside and out (except the kids interior doors)  All in all, 17 doors!  They all got new door handles, all by Nostalgic Warehouse.  For most of the doors I chose a Classic Rosette Waldorf knob in the Timeless Bronze Finish. Some are passage knobs and others are privacy knobs. 


In the bathroom for the closet doors, I used two Classic Rosette knobs with a white porcelain finish. 


This is the view of the toilet room and the door leading out into the Master Bedroom.

This is the linen closet and my clothing closet in the bathroom.

There are 5 total doors in the master bath! Because all these doors have bits of molding at the floor I decided to paint this trim as well to make the transition between doors look more smooth. 


This is a close up of the Waldorf knob. It is so pretty in real life.


Just FYI, I used the 2-3/8″ backset which is standard size. There is a large size if your door have bigger holes. Here is our hallway which looks so much better with this door color and white walls.

Looking at this photo makes me really want to change those DIY light fixtures I did 5 years ago. I took the old "boob" lights and spray painted them and added crystals where the glass was.


My children all got specialty colored doorknobs for their closets. I thought it was a fun touch of whimsy to their rooms. They also lock because this gives them a tiny private space of their own to dress and not worry about their siblings coming in. Luckily their closets are big enough and act like a little "kid cave."  Here is a link to the blue Waldorf knob.


Pink knob for the girl. I just realized the pink and green door knobs are slightly different than the blue and clear. They have a unique cut for the glass.


Emerald Crystal Doorknob in a brass finish for the middle child. 


Now that's you've seen the upstairs, here are some of the downstairs knobs.  I have replaced all of them with Nostalgic Warehouses Classic Rosette but in an antique bronze finish. I'm debating painting these doors in the same color as upstairs. They have also become scratched and there are some touch ups that I've done that don't look so great. 


The downstairs bath has an old vintage door with the original crystal knob. Probably my inspiration for the rest of the house!


The panty door is heavy and solid wood with glass so this doorknob looks especially nice. 


The downstairs linen closet. You can kind of see some splotches here. 


One last photo of knobs that aren't Nostalgic Warehouse. These I picked up a long time ago at Home Goods. They are double dummy knobs which just need to be held to push the door open and don't turn. I may change them at some point but not sure yet.


Well I can say that it was quite fun learning to dismantle door knobs and become a pro at installing door knobs. One thing that did become a little tricky was not having the door latch that attaches to the frame line up exactly. Joe came to my rescue and chiseled away at the hole and then filled the old areas with wood chips and glue. Thank goodness. I would have given up or hired a professional at that point. I must say door knobs can become a little investment, but it's like adding jewelry to your house that you can admire everyday and you don't need to change them if you invest in nice ones.


Happy Almost Spring!!

xo
Cathleen
Related Posts Plugin for WordPress, Blogger...
 

©Copyright PeaHen Pad 2010-2025. All Rights Reserved.