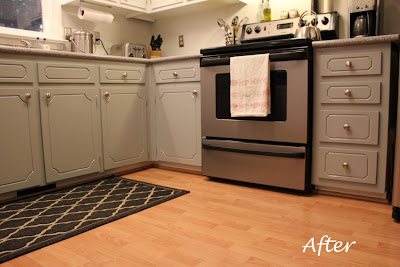
We are true DIYers at heart, but this time around it was time to call on a friend to help. I decided to go for gray cabinets on the bottom half of the kitchen. For many reasons, but the main one being function. The white was getting too figerprinty (I know that's not a word) and dingy with three little ones and two people who love to cook. So we called on our friend, neighbor, and professional painter Tony to help us get the job done.
Here are the cabinets as they looked a few days ago. Notice I have begun removing hardware only to realize I needed to take some before pics.
Here is the cupboard with the paint samples. And just so you know, I didn't go with any of those choices. Tony and I looked at all the Sherwin Williams samples and decided to go with Gray Matters by Sherwin Williams.
I helped Tony remove all the knobs and brackets holding the doors in place and we brought all the doors outside. You could get away with painting cabinet doors while they're still hanging but I needed to paint the actual hardware because the previous owners just painted them without sanding and priming them first so there were lots of chips and paint drips. So while Tony was giving all the doors a good sanding I was sanding the hardware.
The sanding on the insides of the doors was especially important because it was bare wood with a glossy finish. We needed to get the gloss off so that the primer would stick. He made sure to clean and dust off before priming.
Next Tony sprayed Valspar's white primer on the insides of all the cabinets. While he did that I primed all the hardware with one coat of primer and then I did about 3 light coats of Valspar's Brilliant Metal Interior spray in silver from Lowes.
Next we moved the cabinets inside to paint them because there was a good chance of rain outside. This was fine since we have plenty of countertop space.
Tony sanded down all the drawers for me before he gave them two coats of paint with a 2" brush. Oh and Tony was so awesome because he fixed two of our drawers that were coming loose on the front with our air nailer. Talk about going above and beyond!
Once everything was nice and cured we put the hardware back on with new screws I purchased from Lowes that were slightly larger than the old ones to ensure they weren't going to be loose when they went back in. And here are the glorious after shots for ya!
And two more close-ups of just the cabinets.
After completing the cabinets it is very clear that now I have to remove all the upper doors and paint the hardware and the insides to match the outsides. I've got tons of the gray paint left over. So I could paint the upper cabinets gray, but the easiest thing to do would be to leave them white and just do the insides and hardware. I'll keep you posted! For now we are enjoying our new and improved gray kitchen cabinets! A big thanks to Tony for all his hard work and for the beautiful paint job.
xo
Cathleen


4 comments:
I'm a big fan of white cabinets but I must say that the gray you chose is gorgeous and the new color totally suits your space beautifully. It really brings out the detail in the cabinetry much better than the white did. Great job!
Thanks Robyn. You are too kind. I didn't even notice about the details before you pointed it out. But yeah it really does bring out those lines. hehe
Awesome article, it was exceptionally helpful! I simply began in this and I'm becoming more acquainted with it better! Cheers, keep doing awesome!
Nhà Bếp Hoàng Gia
xưởng sản xuất nội thất hoàng gia
tủ bếp gỗ gõ
I recently came upon your blog and wanted to express how much I liked reading your postings. I'm hoping you'll write again soon. Thank you very much for the excellent information. interior and exterior painting
Post a Comment